Posts tagged ‘photo editing’

March 7, 2013

Photo Retouching: Moving Mainstream, Full-Speed

When Photoshop arrived 24 years ago, the photography community was up in arms as it was affecting photographic truth, according to David Hlynsky, a University of Toronto professor in Photoshop and digital media.

Leaving aside the point that photography is more of a point of view than the truth, the question is whether photo retouching is any more dishonest than wearing makeup.

Now photo retouching is moving mainstream – there is no doubt about it. According to a research conducted by Glamour magazine, nearly 60 percent of respondents feel it’s OK for a woman to tweak her personal pictures, and 23 percent of women ages 25 to 29 do it; that number climbs to 41 percent among those ages 18 to 24. “Several years ago, retouching personal photos would have seemed strange, even vain,” says Ann Kearney-Cooke, Ph.D., a Cincinnati psychologist and coauthor of The Life You Want.“This survey shows it’s common and women are fine with it.”

“[Retouching] is the nature of the digital age, we edit because we can,” says Professor Hlynsky. “Technology will process our image whether we like it or not.”

Why do we do it? Your photo makes a big difference in how people perceive you, so you want to put your best foot forward. Photo editing can help a picture appear to be more professional, and can express one’s personality better. That is if it’s done right.

Self-Photoshopping-fails

SOURCES:
Retouching: How Much Is Too Much? – Glamour
Personal Photo Retouching: Millennials Going To Great Lengths For Perfect Pictures Online – Huffington Post
Self-Portrait Photoshop Fails – Resource Magazine
 

photohand-photo-improvement-correction-retouching-ad

January 17, 2012

Cropping Photos to Improve the Visual Effect

Cropping is a useful tool for photo improvement. Though it sounds like an easy trick, cropping is more art than science and you need an eye for it. Still there are some general guidelines that can help you improve the visual effect of your photos.

Focus in!

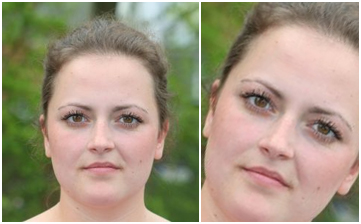
Crop to bring the attention to the main object or person. In a portrait, the person’s eyes are the focal point. If the person is looking sideways, make sure to allow ‘space’ for her to look into or include enough of the object so the viewer knows what the the person is looking at. Otherwise the viewer will wonder what is missing.

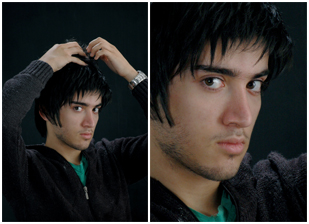
Cropping also lets you remove the parts of the picture that didn’t turn well, let’s say because of awkward posing like in the example below.

Don’t amputate!

Cropping off people’s limbs at joints makes them look like amputees. Despite a very popular concern, it’s okay to crop part of the head if it’s a close portrait, as it will bring more attention to the eyes.  Cutting between the joints is alright as long as it’s still possible for the mind’s eye to fill in the blanks to complete a person’s torso or limb.

An example of bad cropping where the hand cut off at the wrist appears detached. The only way to fix this effect is to re-crop the photo to a close portrait.

Combine tilting with cropping!

In some situations tilting can save the day when you realize the only photo that you like is still bad.

Remove distractions!

Remove the view-spoilers, parts of unidentifiable objects and things that distracts from the story the image is telling.

Someone's back was a view-spoiler in otherwise a nice portrait. The photo allowed for easy cropping that brought the new balance to the composition by seemingly adding to the empty space in the direction of the person' glance.

Watch the ‘negative space’!

This is the space around the central object. Cropping too tightly will make the photo look awkward.

Cropping Contextual Images

The images surrounding the person or the object in the center of attention serve as the context and create the picture story and establish the mood. It becomes a critical compositional component that need to be cropped to have a balanced visual effect. To reach the optimal result, it is recommended to follow the Rule of Thirds.

The Rule of Thirds: Divide the frame into thirds horizontally and vertically. The points where those lines intersect are good starting points to place the main subject. Essentially the primary subject is slightly off center.

In the original photo the person is put squarely in the middle and the background is cropped too tight leaving no breathing space above and below the figure. By cropping right below the hand (not to lose the gesture) and reducing the space on the left we re-balance the composition to bring it it in line with the Rule-of-Thirds.

You might find it impossible to follow all these rules as they start to clash when your photo has more than one problem. You would need to compromise or send it to us at PhotoHand and we’ll apply more advanced techniques to perfect your mementos.

………………………………………………………………………………………………
You might also want to read:
Cropping Photos to Match Printing Standards
Other Point-and-Click Tips

January 16, 2012

Cropping Photos to Match Printing Standards

Cropping is used to make your shots fit the standard photo paper sizes. It’s done by bringing the aspect ratio of your photo to the aspect ratio of a standard print size.

An aspect ratio is simply the ratio between the width and height — the shape of an image. A square photo, for example, would have a 1:1 aspect ratio where the width is the same as the height.

Most digital point-and-shoot cameras have a set frame aspect ratio of 1:1.33 (known as 4:3) when most DSLRs use the aspect ratio of 1:1.5 (known as 3:2).

In comparison, standard photo paper sizes have the following aspect ratios:
6″x4″ – 1:1.5
7″x5″ – 1:1.4
10″x8″ – 1:1.25

As you can see the DSLR aspect ratio fits the format of 6″x4″. In other situations you need to crop your photo.

It is recommended that you crop the photos yourself before sending them to a printer. Otherwise they will use their own judgment what parts of the photo can be sacrificed.

If you need a photo editor, we recommend using GIMP – free open-source software that has been around for quite a while:

for Windows:
http://www.gimp.org/downloads

for Mac
http://www.gimp.org/macintosh

December 15, 2010

Prince William and Kate Middleton’s Official Engagement Portraits With “Minimal” Retouching

According to Associated Press, the official engagement photos of Prince William and Kate Middleton got retouched.

“William’s office says the couple’s two official portraits underwent “minimal” retouching before they were released. The palace said Tuesday that the couple’s appearance was not altered, but adjustments made were to light balance and contrast because “the final portraits are works of art,” like the painted portraits made of previous royal generations.”

Still it looks like some flash glare should have been removed.

link to the AP report

Share this post on Tweeter

Bookmark and Share

Enhanced by Zemanta
December 12, 2010

Photo Retouching: Going Mainstream

Photo retouching, a.k.a. photo editing or airbrushing, is as old as photography itself. But only with the advent of the digital revolution that overturned a lot of concepts in the Photography industry since the beginning of this century, photo retouching became commonplace, extending to family photography – professionally taken as well as amateur shots.

Photo retouching services became affordable to any budget ($3.50/photo at PhotoHand.com) and easily accessible over the web. You can order it 24/7 just like you order books or clothes.

Just decide what you don’t like about the photo, check the pricing schedule and go to the order form to upload your shots and type in your instructions. You will get your images back in the same resolution without any marks claiming the copyright over your photos.

Photo retouching (“photoshopping”) does not mean altering the photos completely, rather it simply modifies the images and removes the flaws originating from technical and non-technical faults.

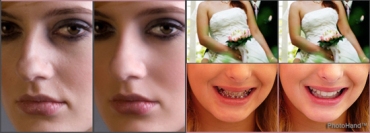
Besides the lighting that you normally don’t have control of outside the studio, there are a lot of mishaps that can ruin the view: exit signs spoil the mood in the wedding pictures and so do slight wardrobe malfunctions like skin overflowing the edge of a sleeveless wedding dress (happens even to the skinniest brides), twisted tense smiles resulting from prolonged posing, electrified hairs crossing faces… There is no reason now to put up with these imperfections that spoil otherwise a perfect memento.

Of course, it takes skill, experience and artistic perspective to improve and sometimes rescue the photo without affecting the originality of the image. Luckily, now the magazine-quality photo editing services are available to every mom, newlywed, serial dater, actor, musician, aspiring model, pageant contestant, starting out fashion designer, beauty professional, life coach… everyone.

Share this post on Tweeter

Bookmark and Share

Enhanced by Zemanta
May 13, 2009

Primp Up Your Indie Image On a Budget

Indie is trendy. If you hear this for the first time, you’ve been out of touch for quite a while and should hurry to Etsy.com to catch up. Whether it’s shoes, clothes, cosmetics, jewelry, bags, gift items, perfume… indie companies are guaranteed to provide innovative offbeat products that will spice up your image.

Innovation is the key to indie success as small companies are faster on their feet than large brands. They also tend to be greener, organic and more conscious of waste.

PhotoHand is a strong supporter of indies and we have a lot of them among our clients. Indies do not have the promotion budgets of big brands but they must have the big brand image quality to sell.

Indie companies on a budget (and most of them are) do not have the resources to hire professional photographers at $100-150/hr to shoot their new products, especially as they introduce one-two new products at a time. Instead they buy professional or semi-professional photo cameras that are becoming cheaper and more powerful and take promotional photos at their make-shift corner studios.

This is a prudent approaching taking into account that even professionally shot photos still need to be photoshopped to bring out the best in the image.

A perfume bottle shot in a make-shift setup with a non-professional camera was color-corrected and photo-retouched by PhotoHand professionals. Complex level - $11.95/photo

A perfume bottle shot in a make-shift setup with a non-professional camera was color-corrected and photo-retouched by PhotoHand professionals. Complex level - $11.95/photo

PhotoHand has been assisting indie companies with this task for quite a while and we keep getting the same question from our clients: How to set up the photo shoot for the best results.

We did some research, consulted several photographers and came up with the basic set of rules that will set you on the right track.

How to set up lighting for a home photo shoot?

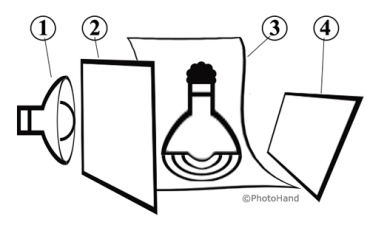
Lighting is of paramount importance in photography. Photographing with natural light will deliver natural colors but only if you shoot on an overcast day that is still bright. You can wait for such a day or imitate these conditions by using easily available elements:

1) A spotlight lamp with a white light bulb. A yellow light bulb will tint the original color of the product;
2) Frosted paper that will be used as a screen to diffuse the light shining on the product and this way prevent the “hot spots” in the photo;
3) A flowing background, preferably stiff paper that won’t crinkle;
4) A sheet of white paper to reflect the diffused light from the spotlight lamp and partially illuminate the other side or the front of the product. This is necessary to avoid sharp light/shade contrast (unless you want it for some artistic effect).

The following diagram shows how to arrange these items for the photoshoot setup at home.

This diagram shows how to arrange these items for the photoshoot setup at home.

How to set your camera for the product photo shoot?

No-Flash-No-GlareTurn off the Flash. Flash glare on objects is very hard to photo retouch because it means loss of digital information. A photo retoucher would have to fill up the blanks by using his/her imagination.

Macro-for-close-up

Set your camera to MACRO for the close-up view.

That’s it.  Happy shooting!  And remember, PhotoHand is always there for you to glam up your image.
Bookmark and Share

Reblog this post [with Zemanta]